Silent Liveness
1.Product Description
1.1 Introduction
The purpose of liveness detection is to detect whether a face is “alive” or just a fraudulent reproduction.
To ensure a faster and more convenient protection against spoofing, silent liveness detection is used. Silent liveness detection is non-intrusive. In other words, there is usually no way for the user to know they are being tested. The system does everything on its own – users don’t have to pay any attention at all.
1.2 Process Flow
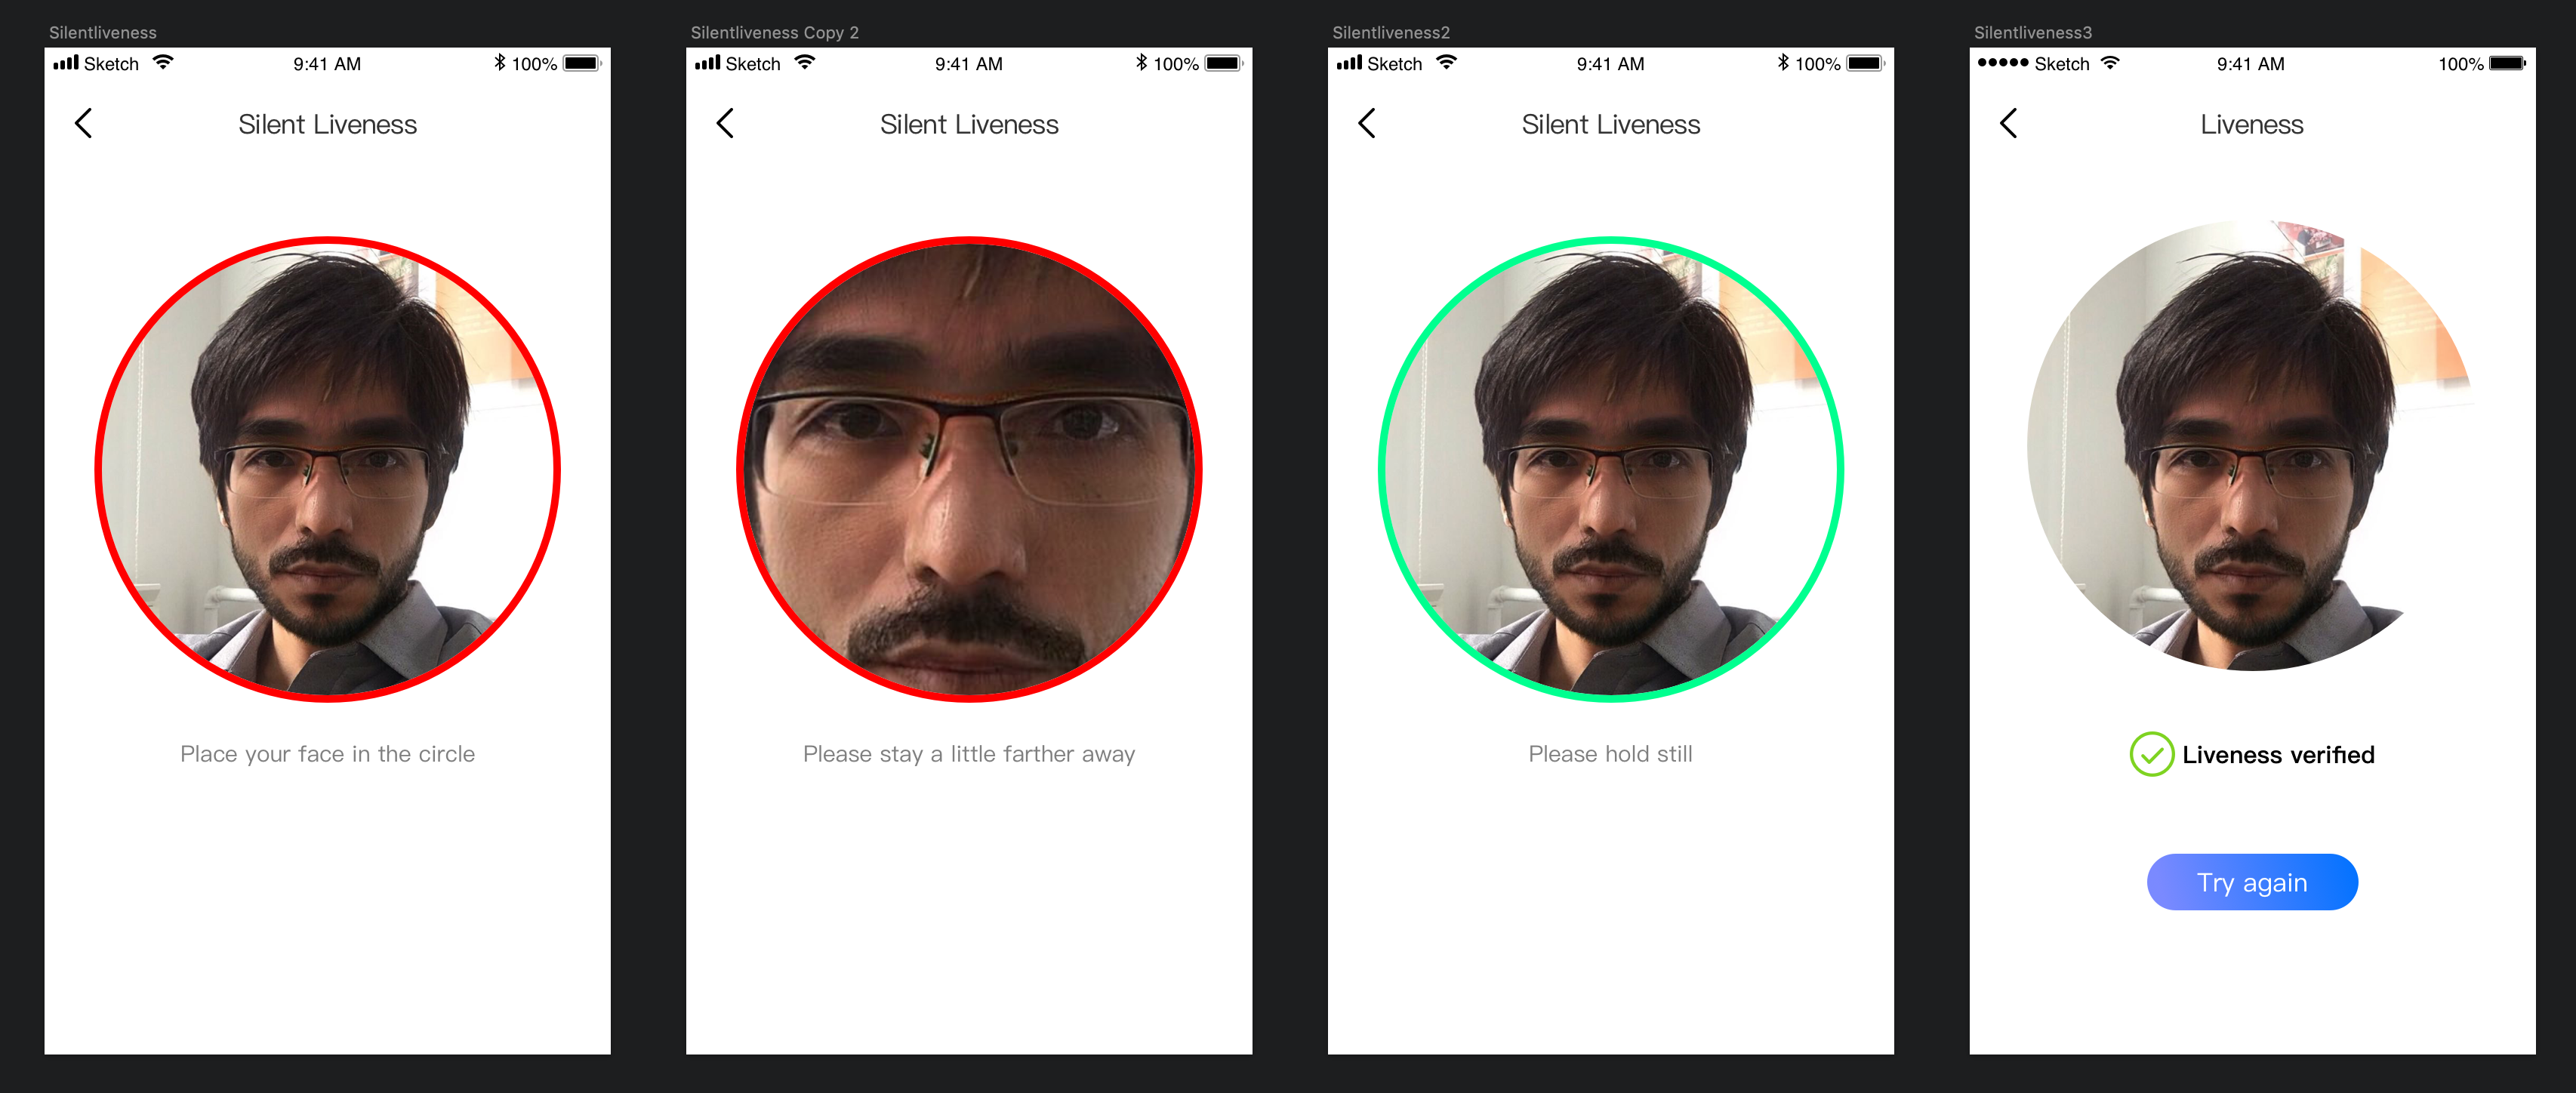
1.3 Anti-hack Flow
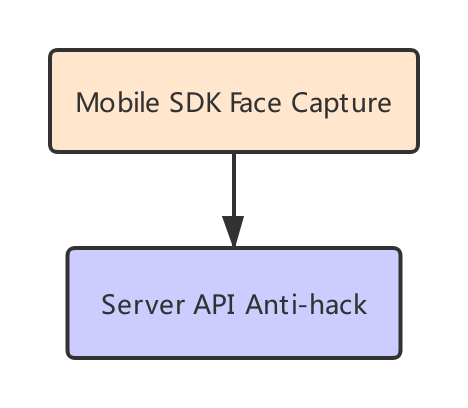
Mobile SDK: You should integrate it in your Android application first, this will help you to capture face image.Server API(Anti-hack): It will help to check whether the face in uploaded encrypt buffer is real face or not, Server API Doc . In Silent liveness SDK, we have implemented this API.
1.4 App Increments
Support cpu structures: armeabi-v7a,arm64-v8a.
SDK dual architecture compilation increments is 2.4M, and armeabi-v7a compilation increments 1.9M, arm64-v8a compilation increments 2.0M.
The minimum support system version Android4.2.
2.Quick Integration Guide
2.1 Note
License file (DFLicense) is used to control the package name and valid time of the program (the time range can be obtained by directly viewing the content of the file). Please make sure that the package name of the program is the same as the package name bound to the license.
2.2 Quick Integration
We supply two different integration modes for you to integrate liveness into your application.
2.2.1 Integration with maven
Open any Android project and add the following maven repository configuration to the project's build.gradle.
 maven {
      url 'https://maven.accuauth.com/repository/maven-releases/'
      // If your gradle version is greater than 7.0, you need to add the following configuration to allow pulling aar via http
      allowInsecureProtocol = true
 }
Add library dependencies to the project's app module build.gradle.
implementation 'com.dfsdk.liveness:df-liveness-silent-sdk:2.2.0@aar' implementation 'com.liveness.dflivenesslibrary:df-liveness-silent-ui:1.0.6@aar'- Add DFLicense file to your project's assets directory.
Enable anti-hack
If you want to enable anti-hack, please set KEY_ANTI_HACK(default false) parameter.
intent.putExtra(DFSilentLivenessActivity.KEY_ANTI_HACK, true);
intent.putExtra(DFSilentLivenessActivity.KEY_API_ID, BuildConfig.API_ID); // if KEY_ANTI_HACK is true, you MUST set this value
intent.putExtra(DFSilentLivenessActivity.KEY_API_SECRET, BuildConfig.API_SECRET); // if KEY_ANTI_HACK is true, you MUST set this value
intent.putExtra(DFSilentLivenessActivity.KEY_HOST_URL, BuildConfig.HOST_URL); // if KEY_ANTI_HACK is true, you MUST set this value
HOST_URL MUST be the 'Request URL' value in Server API Doc
2.2.2 Integration with library module
Please follow below steps to integrate silent liveness into your app.</br>
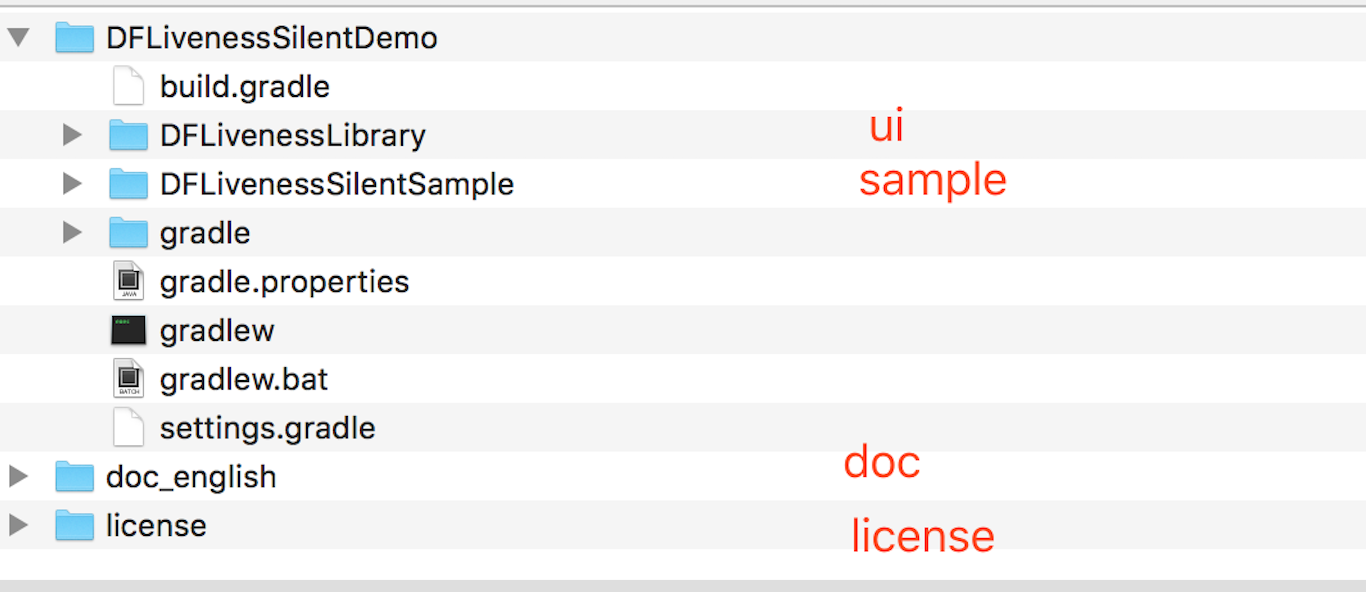
SDK Directory Structure
Quick Integration
Before you use the SDK, you need to integrate it into your development environment first.
Import DFLivenessSilentDemo's DFLivenessLibrary module to your project by File->New->importModule->Select the DFLivenessLibrary in DFLivenessSilentDemo folder->Continuously click Next to complete the import.
Add the following code to the build.gradle in your application.
  repositories {
     flatDir {
             dirs project(':DFLivenessLibrary').file('libs')
     }
  }
Add following code in the dependencies{} section of build.gradle.
compile project(':DFLivenessLibrary')For example:
 allprojects {
     repositories {
         google()
         jcenter()

         flatDir {
             dirs project(':DFLivenessLibrary').file('libs')
         }

     }
 }

  dependencies {
      compile project('DFLivenessLibrary')
  }
Add DFLicense file to your project's assets directory.
Enable anti-hack
If you want to enable anti-hack, please set KEY_ANTI_HACK(default false) parameter.
intent.putExtra(DFSilentLivenessActivity.KEY_ANTI_HACK, true);
2.3 Start Detection
Make sure your own Appliction class to implement DFTransferResultInterface interface
If you do not have your own Application class, please customize it.
public class MyApplication extends Application implements DFTransferResultInterface {

    private DFProductResult mResult;

    @Override
    public void setResult(DFProductResult result) {
        mResult = result;
    }

    @Override
    public DFProductResult getResult() {
        return mResult;
    }
}
Launch detection
Bundle bundle = new Bundle();

Intent intent = new Intent();
intent.setClass(this, DFSilentLivenessActivity.class);
intent.putExtras(bundle);
//Enable to get image result
intent.putExtra(DFSilentLivenessActivity.KEY_DETECT_IMAGE_RESULT, true);
startActivityForResult(intent, KEY_TO_DETECT_REQUEST_CODE);
Use onActivityResult to receive data
Get SDK result by onActivityResult(int requestCode, int resultCode, Intent data) function.
if resultCode == Activity.RESULT_OK, the liveness detect success, otherwise liveness detect fail.
To anti-hack, send livenessEncryptResult buffer to Server API
if (resultCode == RESULT_OK) {
    DFProductResult mResult = ((DFTransferResultInterface) getActivity().getApplication()).getResult();

    ///get key frame
    DFLivenessSDK.DFLivenessImageResult[] imageResultArr = mResult.getLivenessImageResults();

    if (imageResultArr != null) {
        int size = imageResultArr.length;
        if (size > 0) {
               DFLivenessSDK.DFLivenessImageResult imageResult = imageResultArr[0];
               Bitmap imageBitmap = BitmapFactory.decodeByteArray(imageResult.image, 0, imageResult.image.length);
          }
     }

      // the encrypt buffer which is used to send to anti-hack API
      byte[] livenessEncryptResult = mResult.getLivenessEncryptResult()
} else {
    Log.e("onActivityResult", "silent liveness cancel,error code:" + resultCode);
}
When liveness detect fail, the error code(resultCode) refers to the error code
If you want to implement anti-hack by yourself
Send encrypted buffer to server, you could refer to the following code.
/**
* DFNetworkUtil.java
* package com.liveness.dflivenesslibrary.net
**/

public static DFNetResult doAntiHack(byte[] data) {
    HashMap<String, byte[]> hashMap = new HashMap<>(1);
    hashMap.put("liveness_data_file", data);
    DFNetResult dfNetResult = new DFNetResultLiveness();
    return doInternal(SILENT_ANTI_HACK_URL, null, hashMap, dfNetResult, new NetworkResultProcess() {
        @Override
        public void resultProcess(DFNetResult result, JSONObject netResult) {
            double score = netResult.optDouble("score");
            result.mNetworkResultStatus = score < ANTI_HACK_THRESHOLD;
        }
    });
}
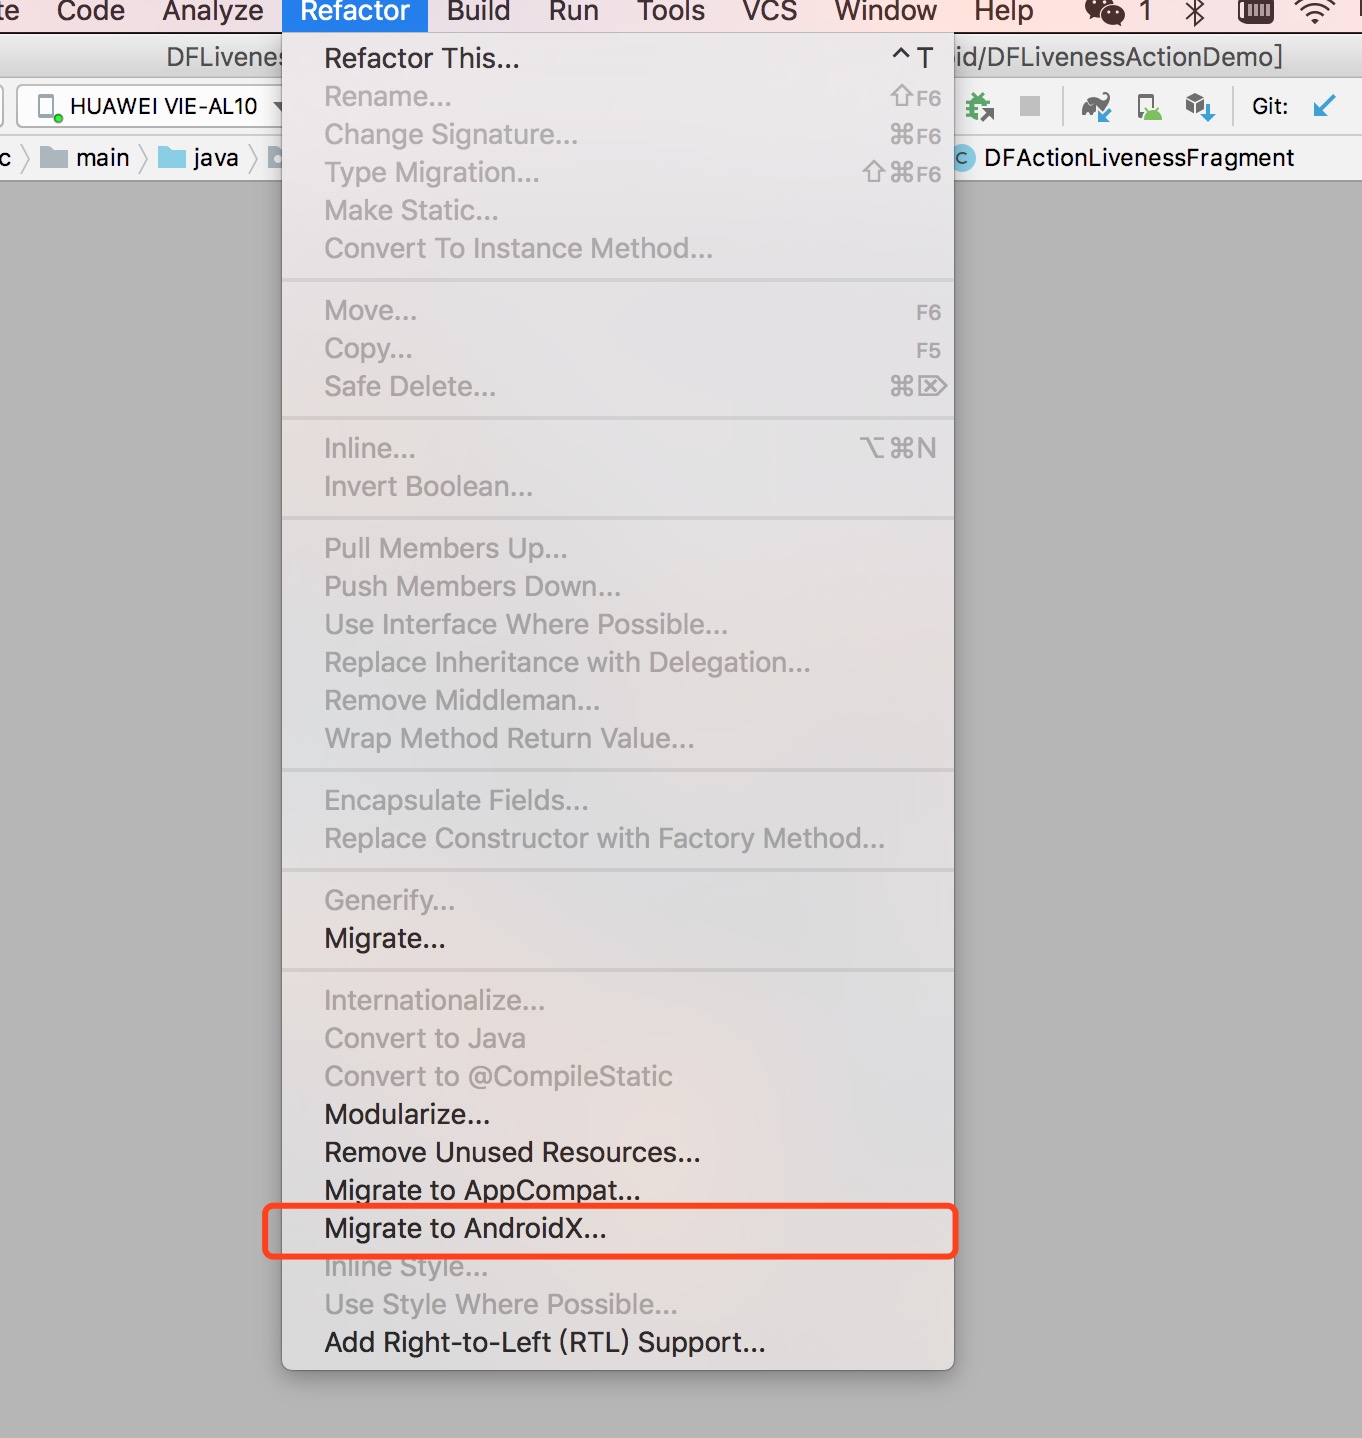
2.5 AndroidX Migration
The gradle plug-in version of build.gradle in the application should be no less than 3.2
classpath 'com.android.tools.build:gradle:3.2.0'
compileSdkVersion and targetSdkVersion are not less than 28
compileSdkVersion 28
defaultConfig {
        targetSdkVersion 28
    }
AS 3.2 or above version provides a much faster and easier way to migrate to AndroidX with one click.Select ReFactor on the menu - Migrate to AndroidX...
 ecuador